Converting A Door From Extension To Torsion Spring

Converting a door from Extension Spring to Torsion Spring

In this how-to guide, we will be going through the proper steps to convert a garage door from an extension to torsion spring setup. We are confident that this guide will help you be a better installer and, in turn, help you provide better service and value to your customer.

ADVANTAGES OF USING A TORSION SPRING

There are many advantages to using a torsion spring over an extension spring. Below we go over them.

Extension Springs are Dangerous

There are no safety cables installed to prevent an extension spring from breaking and flying off and hurting someone or causing damage to a car or other property.

Because torsion springs are contained on the door shaft, if one were to break, the risk of damage or injury is reduced.

Improperly Balanced Doors

Extension springs are not always able to balance a garage door correctly. In order to ensure the door is properly balanced, you must make sure that the initial tension is set correctly.

Torsion springs are engineered based on door weight, door height and cable drums used. This ensures you have the correct spring for your door and that it will be balanced after proper installation.

Higher Door Cycles

Extension springs are manufactured at about 10,000 to 15,000 cycles.

Torsion springs can offer a much higher cycle if engineered with upcycling in mind. This allows you to upsell a longer lasting spring to your customer.

BEFORE YOU GET STARTED

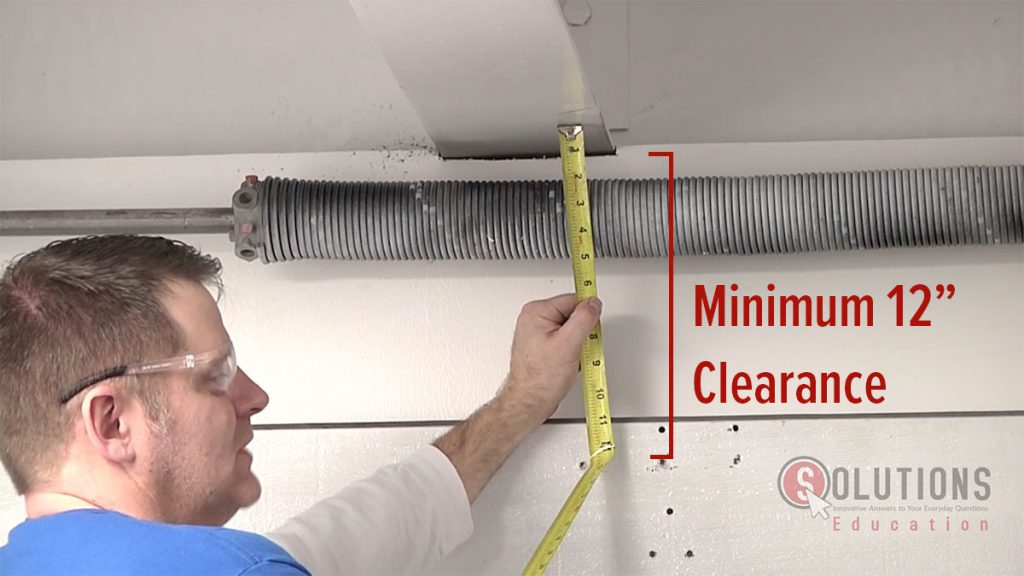
  • Make sure the current extension spring door has enough room above the opening of the garage door to mount a torsion spring assembly.
12
The minimum amount needed is 12 inches.
  • Determine how much the garage door weighs.

There are two ways to do this.

  1. If the door balances, you can put the doors dimensions into the SSC Spring Engineering App (Download Here) to figure out the approximate pull of the current springs.
  2. If the door is not balanced well, we recommend you use a counterbalanced lever arm and weigh the door. With the weight known, you can use our SSC spring engineering app to calculate what torsion spring you will need, and which type of drum to use.

INSTALLATION STEPS

  • First, lift the door beyond the fully open position. Place a pair of vise grips under the bottom roller on each side to prevent the door from falling back down.
  • Next, release the tension off the spring by removing the front attachment usually secured with an “S” hook.
  • Once removed, you can remove the extension springs, cables and any connecting hardware.

PRO TIP: WHILE THE DOOR IS IN THE OPEN POSITION, IT IS A GOOD TIME TO REPLACE THE CABLES.

  • Once all hardware is removed and cables replaced, carefully lower the door. **Keep in mind you will be lowering the full weight of the door.T

WE RECOMMEND YOU HAVE HELP AND TO BE MINDFUL OF ANY PINCH POINTS.

  • Fully close and level the door. As we mentioned, the torsion spring should be engineered based on the garage door’s weight.
  • If you haven’t done so, you’ll want to prepare your counterbalance assembly. To learn more about counterbalance assemblies and setup, see our introduction guide here.

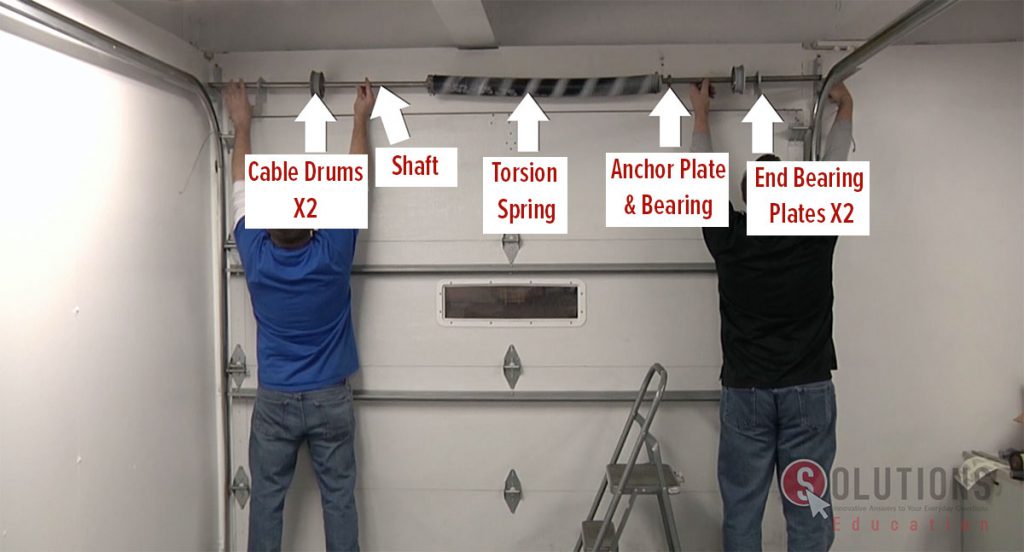
All torsion spring counterbalance assemblies should have:

Where to position parts when installing a Torsion spring

Depending on the results you receive from the SSC solutions engineering program, you will either use one or two torsion springs.

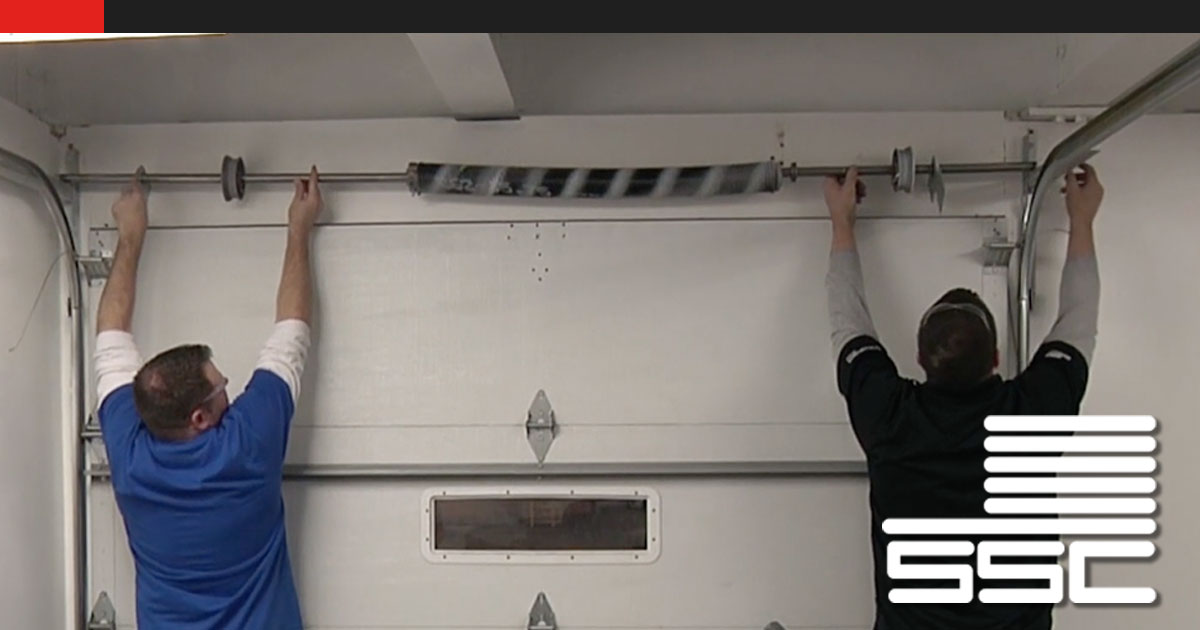
  • With the counterbalance assembly ready, set the assembly on top of the tracks.
  • Next install the assembly’s center mount to the header, followed by securing the end bearing plates.
  • Once complete, secure the stationary portion of the spring to the spring anchor plate.

PRO TIP: TO HELP WITH LEVELING THE DOOR, WE RECOMMEND YOU START ON THE LEFT SIDE

  • Attach the cables to the cable drums making sure the cable is behind all rollers and free and clear of the door sections.
  • Next, secure the cable drum to the shaft & use a pair of vise grips on the shaft to make sure it won’t roll back and loosen the cable.
  • Now, move to the other side and repeat the steps to secure the cable to the drum.
  • With the cables and drums secure, add the tension to the spring and secure it to the shaft.
  • With the spring secure to the shaft, remove the vise grips from the shaft and manually open the door.

ALWAYS WORK THE DOOR BY HAND TO MAKE SURE EVERYTHING IS BALANCED AND WORKING SMOOTHLY BEFORE ATTACHING THE OPENER.

To watch the full video and other helpful videos be sure to check out our Solutions Education library.

Not signed up for Solutions Education courses. All are free to garage for dealers and installers. *Register Company | *Register Employee

(*Must be a registered company of SSC to access above registrations. Register Here)

4 Min. Read

Related:

Share:

Facebook
Twitter
LinkedIn

Safety Disclaimer: In order to see all procedures completely, there may be safety measures that are not taken by our actors. Be sure to follow any and all proper safety requirements and refer to your manufacturer’s installation manual for details. Your health and safety is the #1 concern. Failure to understand/follow the recommendations in the course could result in property damage, personal injury or death. While all efforts are made to provide accurate information and guidance, it is impossible to predict all door circumstances. Accordingly, the user agrees that the user of this video; products and information contained herein are at your own risk. In no event shall Service Spring be liable for any property damage, personal injury/death, or any other loss or damage that may result from your use of the information and products provided on this video. All information contained within this site is provided “as-is” without warranty expressed or implied. User assumes all responsibility/risk for use of information and products purchased. If you have any doubts about your ability to perform the work safely, we recommend you contact another door professional to complete your repair.

Earn Free Swag
Place your Order Today!

Offer valid 11/20 – 11/22/23. Multiple orders will be totaled and gear awarded on final invoice total. To qualify invoice must meet minimum total less freight and/or taxes. All items shipped to address on file in 6-8 weeks. While supplies last. Promotional items subject to change without notice. No prize customization. Promotional items shipped to US addresses only. All items imprinted with SSC. Phone orders available Monday, 11/20-Wednesday, 11/22. Account must be current and in good standing to qualify. Additional restrictions may apply.